

Pantry Makeover
/I am so excited to present to you my new pantry! Let me tell you that this reorganization has been a labor of love. I sought to create a space that I would be happy to keep organized and clean. What resulted was a space way more beautiful beyond my imagination and the best room in the house.

We were very lucky to have a pantry in our home - and a walk-in one at that! When we acquired our house, our pantry soon became overrun with all the things we couldn't find homes for in other parts of the house. There was so much potential to store a ton of things in here, but it was badly laid out from the start.

The floor had become a major trip hazard. So, I went from that catastrophe to this jewel...
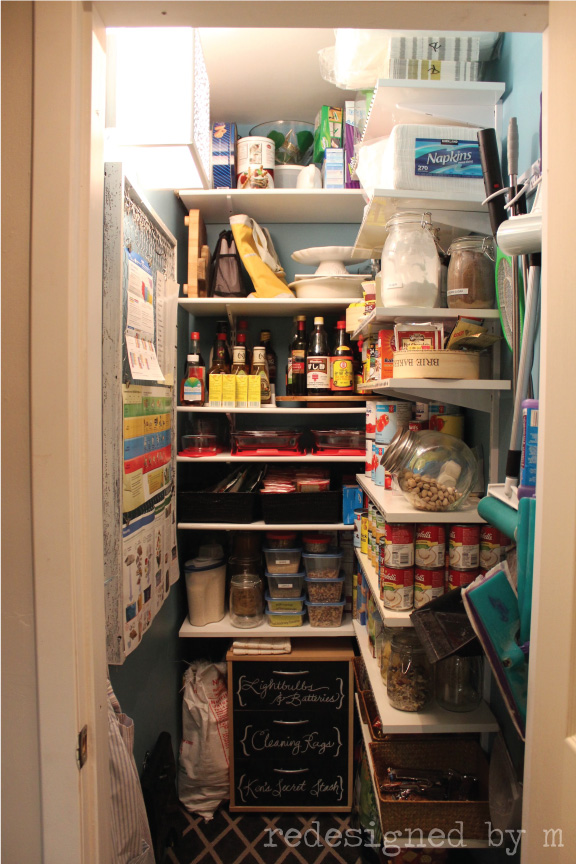
It's like I can hear the angels sing "ta-daaaaaa" every time I open the door now. This room is my pride and joy. All the rooms that I work on from now on have to meet this caliber of beauty and functionality. (I've set quite the bar for myself.)
(And yes, that is a giant bag of rice on the floor to the left. We are an Asian household and we eat a buttload of rice. True story.)

The biggest problem I discovered was that the shelves were hung two deep, creating surfaces that were too deep to store small items like canned goods and cereal boxes; not to mention that they were also hung too far apart. Things got buried towards the back and did not make them easy to access and stacked too high.

The first step I took was to empty everything out. Not only is this the most crucial thing to do at the onset of any organizational project, it was absolutely necessary for this project because I wanted a new, more functional shelving system.
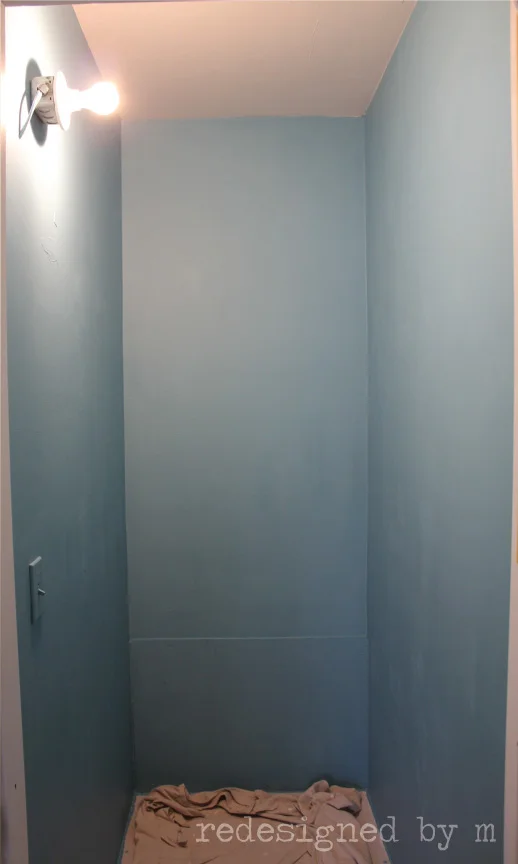
I could have just put up the shelving and put all the pantry items away, but why not take the extra step to really jazz it up? So I painted and created an area rug to cover the hideous plywood floor.
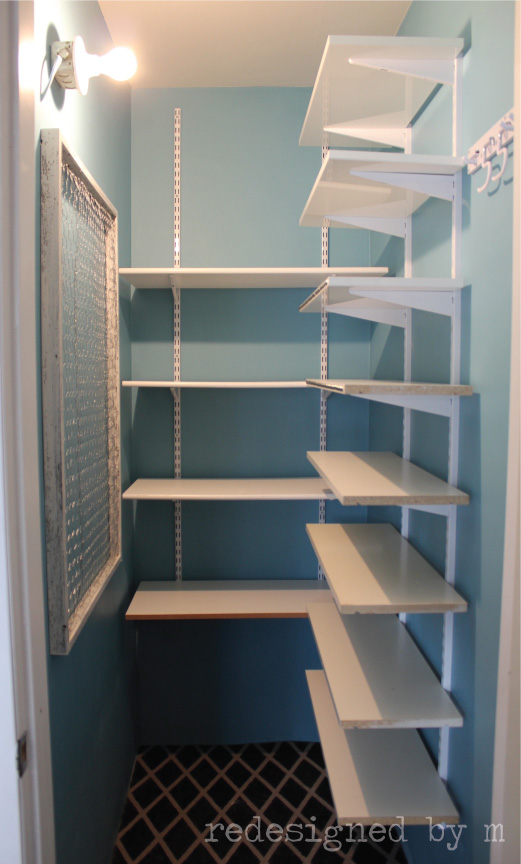
And then I hung up the shelving! No more shelves hung two deep. Under my control, I put in shelves that were no more than 14" deep. As my pantry is deeper than it is wide, I was able to wrap shelving around the walls to create an L-shape layout. I also wanted shelving that I could adjust in height in order to accommodate any new items, so I got these adjustable uprights that screwed into the wall. The brackets just slipped into the uprights and the shelves sat on the brackets. If ever I need to raise or lower the shelves, I can do so easily without adding more damage to my walls.
Enough blabbing... let me give you a tour!
- I repaired a hole in the wall and buried an electrical cord behind the wall. Then I covered the bare bulb with a repurposed lamp shade.
- A board made with chicken wire was made to hang up information about our recycling program and garbage pickup dates.
- The bare plywood floor was covered with an area rug that I made.
- This used to be our nightstand at the old place, but since we got new nightstands, I no longer needed this. So I used it here to store small items.
- The fronts of the shelves were dressed up with nailhead detail.
- While we reused the shelves from the old pantry, we still needed more. Extra shelves were purchased at Ikea in the "As Is" section for $2 a piece. I think they were originally kitchen cabinet doors, but they hadn't been drilled for hinges. Some of the edges were unfinished so I got a roll of melamine tape from Home Depot and ironed them onto the raw edges to finish the shelves.
- I made space in the pantry to store our brooms and mops. They're hung up with a wall-mounted broom holder to keep them off the floor.
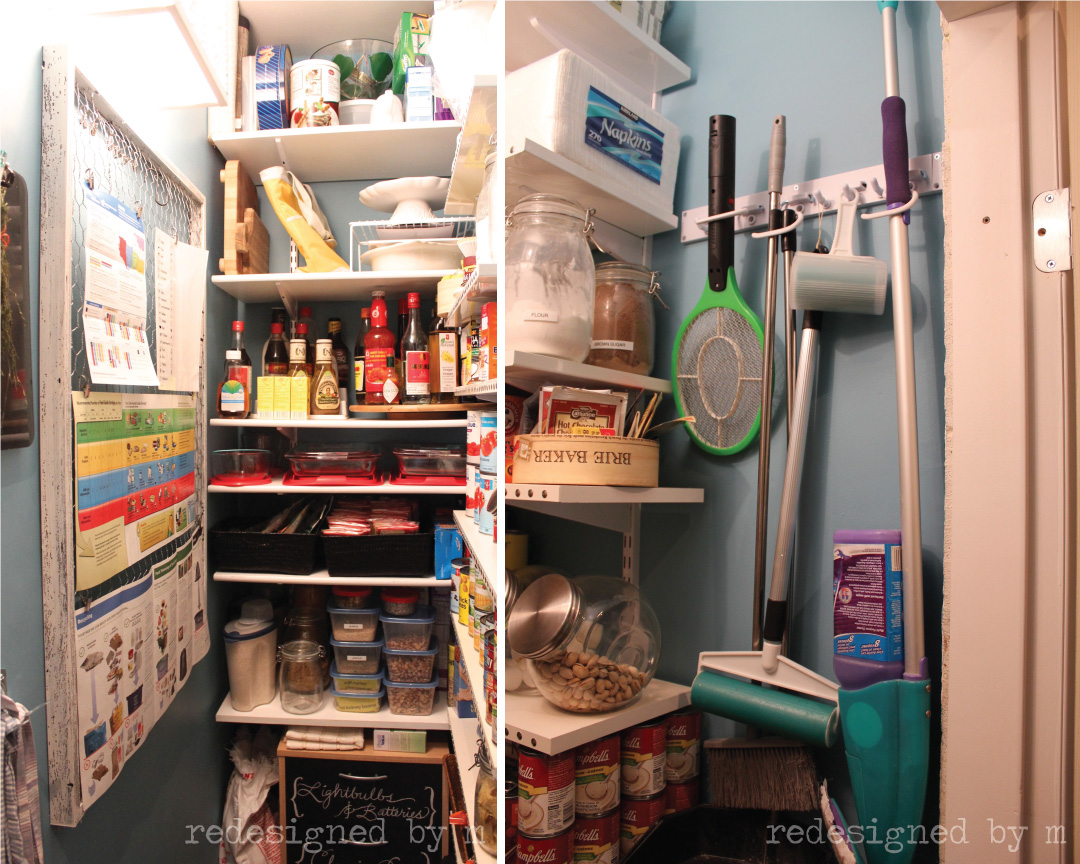
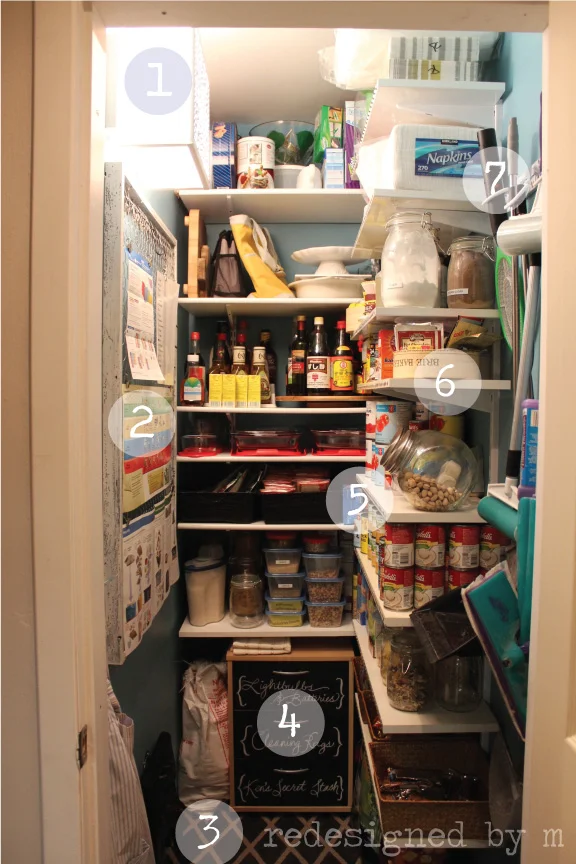
Here's a better look at the left side and right side of the pantry.

I especially love that we can walk into the pantry now. No more trip hazard!
Organizing Techniques From My Pantry

Hooks. I found these hooks from Dollarama. They were a great deal at $1.50 as there were FIVE (!) in a package. They're really utilitarian, I know, but how could I argue with that price? They're great for hanging up my dustpan/broom sets (I have a set for floor sweeping and a set for counter sweeping and they're both labeled as such), the little step stool I use to access the upper shelves, and aprons.

Lazy Susans and Shelf Risers. Keep all your bottles of condiments and ingredients together on a lazy susan. You just need to turn it to access your item without rummaging through all your bottles. I used shelf risers to separate my cake stands and store any unopened stock of condiments and dressings. (We like to buy large quantities when there's a sale.)

Baskets. Top photo: The black baskets store microwave popcorn and heavily sodium ladened meals that Mr. M loves. Bottom photo: I keep snacks in the brown baskets on a low shelf for easy access. Granola bars are stashed in the basket nearest the door for breakfasts on the run.

Keep Similar Items Together. If you corral any like items and store them together, you'll never have to hunt around for your things again.
- This shelf is for any ethnic foods and holiday items.
- All the juices are kept together. The glass containers hold an overflow of homemade snacks, located right above the snack baskets.
- Party items are grouped together so we know where to look when we have guests. This shelf needs to be organized a bit better, but it's pretty good for now.
- The canned foods and soups are stacked neatly with the labels facing forward like they do in grocery stores. It makes seeing what you have in stock at a glance much easier.

Take things out of bags and packages. I emptied the contents of our bulk purchases into clear containers and labeled accordingly. I didn't bother to do up gorgeously printed labels for these containers. Maybe some day I will, but right now, I have a love affair with my label maker. I like that my containers aren't filled to the rim and there's room for new purchases.

Food Containers. I spaced two shelves really close together so that I could store my glass containers easily. This avoids the necessity of shelf risers and eliminates stacking, which can chip the glass.

Use The Back Of Your Door. You can store so many more things by using the back of your door as an honorary wall. For my pantry, I used an over-the-door multi-pocket organizer. Since I intended to store gravy and marinade packets in here, I didn't want a shoe organizer because the pockets would be too deep. However, that would work just as well. I do recommend that the pockets be clear so you can see what's inside the pockets at all times. In this scenario, "out of sight, out of mind" will definitely apply. Oh, and one more thing. Since the pocket organizer is made to fit over the entire door and I have bag storage at the bottom of the door (see next section), I had to shorten the length by folding up the top of the organizer, clipping it to a pant hanger, and hanging it off an OTD hook. I didn't dare cut off any part of it unless I wanted to reuse it elsewhere in the future.

This is another shot of the over-the-door organizer. I like OTD organizers best for hollow core doors (which is what I have throughout the house).

Reusable Bag Storage. We used to nest our reusable bags into a larger bag that sat on the floor and became a minor trip hazard. Or we'd have to move out the large bag of reusable bags before we could access the shelves. I remedied this problem by mounting these Rationell Variera Trash Baskets from Ikea onto the back of the door. Since we have so many bags, and we do use all of them, I got two.

Shopping List. Keep a clipboard and pen near the door for your shopping list. Some people like to write things on boards, but I like to take a physical shopping list with me when I shop, so having a paper list on hand is a good system for me.
Other Thing Of Note. Place cleaning supplies and lesser used items on the upper shelves, as well as in dead corners.

There you have it! My beautiful new pantry! I'm so in love. I literally wake up every morning, open the door to this little room, turn on the light, and sigh at the zen-ness of this space. (Don't judge me.) I'd love to know your thoughts! If you did a pantry makeover, please share it with me. I love looking at room makeovers.
Total time: A whole weekend. Friday through Sunday. This is only the wall repair, painting, shelving installation, and putting all the items back in. Time for the painted area rug, lamp shade, nailhead detail is not counted into this total.
Total cost breakdown: Paint was leftover from a friend = $0; Shelving uprights and brackets from Home Depot = $219.27; Extra shelves from Ikea = $2 each; Broom holder from Home Depot = $8.99; Baskets from Superstore on Boxing Day = $2 each; Metal hooks from Dollarama = $1.50/pack of 5; Drawer unit reused from previous home and leftover chalkboard paint = $0; Wood lazy susan from Ikea = $9.99; Wire shelf riser from Bed, Bath, & Beyond = $5.99; second lazy susan and shelf riser from previous home = $0; OTD pocket organizer from Bed, Bath, & Beyond (Real Simple brand) = $19.99; Reusable bag storage from Ikea (Rationell Variera Trash Baskets) = $5.99 each. All items were purchased in Canada, except for the ones from Bed, Bath, & Beyond, which were purchased in the US. After taxes, this pantry cost a total of: $313.83.